PRACTICE SETTINGS/LOGO

Edit PRACTICE SETTINGS/LOGO

  • Go to CONTROL PANEL then select
  • EDIT OPTIONS
    • PRACTICE NAME
    • OFFICE EMAIL
    • OFFICE PHONE
    • STREET ADDRESS
    • SECONDARY ADDRESS
    • CITY
    • STATE
    • ZIP CODE
    • PRACTICE LOGO
      • File types accepted are jpeg, png, or svg
      • File size limit is 1 MB

 *LOGO will display on Practice EMR and printed office notes

  • Choose SAVE


COLOR THEME

Edit COLOR THEME for practice

  • Go to CONTROL PANEL then select
  • Go to COLOR THEME and select
    • Choose from one of the pre-set options
    • Unable to offer custom colors currently
  • Choose SAVE
Add STAFF

Add, Edit or Delete Staff to your practice

  • Go to CONTROL PANEL then
  • Choose 
    • NAME – Enter name of new staff member (Doctor, Nurse, Assistant. Etc)
    • EMAIL ADDRESS – Enter email address for new member. This will be their USERNAME to access MedChartz
    • STAFF TYPE – Choose role for this user
      • DOCTOR
      • GENERAL OFFICE
    • PERMISSION TO APPROVE DOCUMENTS
      • Check if this user will have the ability to approve and clear uploaded files to patient charts
      • Uncheck if this user will not have the option to approve and clear uploaded files to patient charts
    • DO YOU WISH TO ADD A CALENDAR FOR THIS USER?
      • YES – This user will have their own scheduling calendar created and have the ability to schedule patients
      • NO – This user will not have their own scheduling calendar
  • to add this new staff user

Edit STAFF
  • To the right of each staff user is an ACTION option
    •  EDIT
    •  DELETE

Each schedule can be edited from the control panel.  Setup start and end times as well as lunch hours for each workday.  Include or exclude weekends

  • Go to CONTROL PANEL  then
  • Work schedule blocks will show for each staff member with a current calendar.  To ADD/DELETE calendar for a user
        • Go to CONTROL PANEL/STAFF ADMIN
        • Select  under actions for user
        • DO YOU WISH TO ADD A CALENDAR FOR THIS USER?
          • YES – This user will have their own scheduling calendar created and have the ability to schedule patients
          • NO – This user will not have their own scheduling calendar


  • Edit times for each day include;
    • Workday Start Time
    • Lunch Start Time
    • Lunch End Time
    • Workday End Time
  • Check/Uncheck if your practice offers weekend hours.

Cloud-based software that allows any user within the practice to have their own scheduling times.  Options include automated email/sms reminders as well as providing patients access to add themselves to a schedule through their patient portal.

  • Go to SCHEDULE located top menu any page
  • WEEKLY CALENDAR FOR:
      • Drop down box to select user calendar to view
      • Sets current calendar as the Default Calendar when first opening
      • Saves current calendar view as a PDF file
      • Quick access to edit staff scheduling
  •  Choose to view calendar by the DAY, WEEK or MONTH
  • Move calendar back or forward using arrows or return to current date by selecting TODAY
  • CREATE NEW EVENT
      • Select  bottom right of the calendar or DOUBLE-CLICK where you want to add a new event
        • TYPE: Options include Office Visit, New Patient, Preop, Physical, Telephone, Video, Blood Draw, To Do, Injection, Personal, Lunch, Available for Patient
        • DATE: Default same day will display
        • TIME: Start and end time of event
        • PHYSICIAN: Select Physician from drop down list
        • PATIENT: Begin typing to search for patient.  List will be generated from practice active patients
        • NOTES: Add notes for event

  • EDIT EVENT
    1. Click and drag event to new slot (confirmation message will display) OR
    2. Single click on event and choose   OR Double Click on event to open UPDATE APPOINTMENT box
      Make adjustments then select
  • Delete event
    1. Single click on event and choose  or
    2. Double Click on event and choose

All patients have access to their personal chart using a browser on a computer or smartphone.  Patients have a view only mode and no changes can be made.  There is currently no app for MEDCHARTZ.


  • First time users choose FORGOT YOUR PASSWORD and they will be redirected to the following page;

  • Patients should enter the email set in the system when creating their new patient chart. Once the password is reset, they will have complete access to their medical records.


**Any .pdf files uploaded but not cleared by the medical staff will not display on the patient’s chart.  Once cleared, these records will be accessible to the patient.


Add New Task

Tasks are used for intra-office communication.  Select at the top of the page from anywhere in the chart

  • To add a new task, select 
    • TITLE – Enter a task title
    • TASK DESCRIPTION – Enter details on the task requested
    • CREATED BY – Auto-selects the user currently logged in
    • ASSIGN TO – Choose staff member to send task from the drop-down tab. Choose UNASSIGNED if open for any staff to accept
    • DUE DATE – Auto-populates today’s date
    • PATIENT – Pull patient name into box by typing in names. Select from options.
    • NOTES – Add any extra notes
  • Select

Tasks to be Completed

Displays tasks assigned to user signed in

  • To view task, select  next to the task name
  • To respond, enter text within TASK DESCRIPTION and/or NOTES
  • ASSIGN TO will auto-populate to the staff member that created the last edits
  • Select and new task will be created and displayed on the ASSIGNED TO chart.
  • Select  to end communication and close task

All Open Tasks
  • Displays all open tasks that user is a party to and have yet to close

INBOX displays all patient uploads that have not been cleared yet.  Any .pdf files uploaded must go through the INBOX for verification.  Since patients have access to their personal charts, this system offers a safeguard to avoid displaying other patient’s medical information if improperly uploaded to the wrong chart.

To access, select INBOX at the top of the page from anywhere in the chart.  Information on files uploaded will display;

  • Access patient’s chart by selecting their name in BLUE
  • View .pdf file attached to patient’s chart by selecting the  icon
    • Image will be displayed to the right
    • An option to create a new TASK will be displayed to the left. Create new TASK for intra-office communication (see TASKS HELP)
  • To accept, clear and release file to patient’s chart, select the  icon

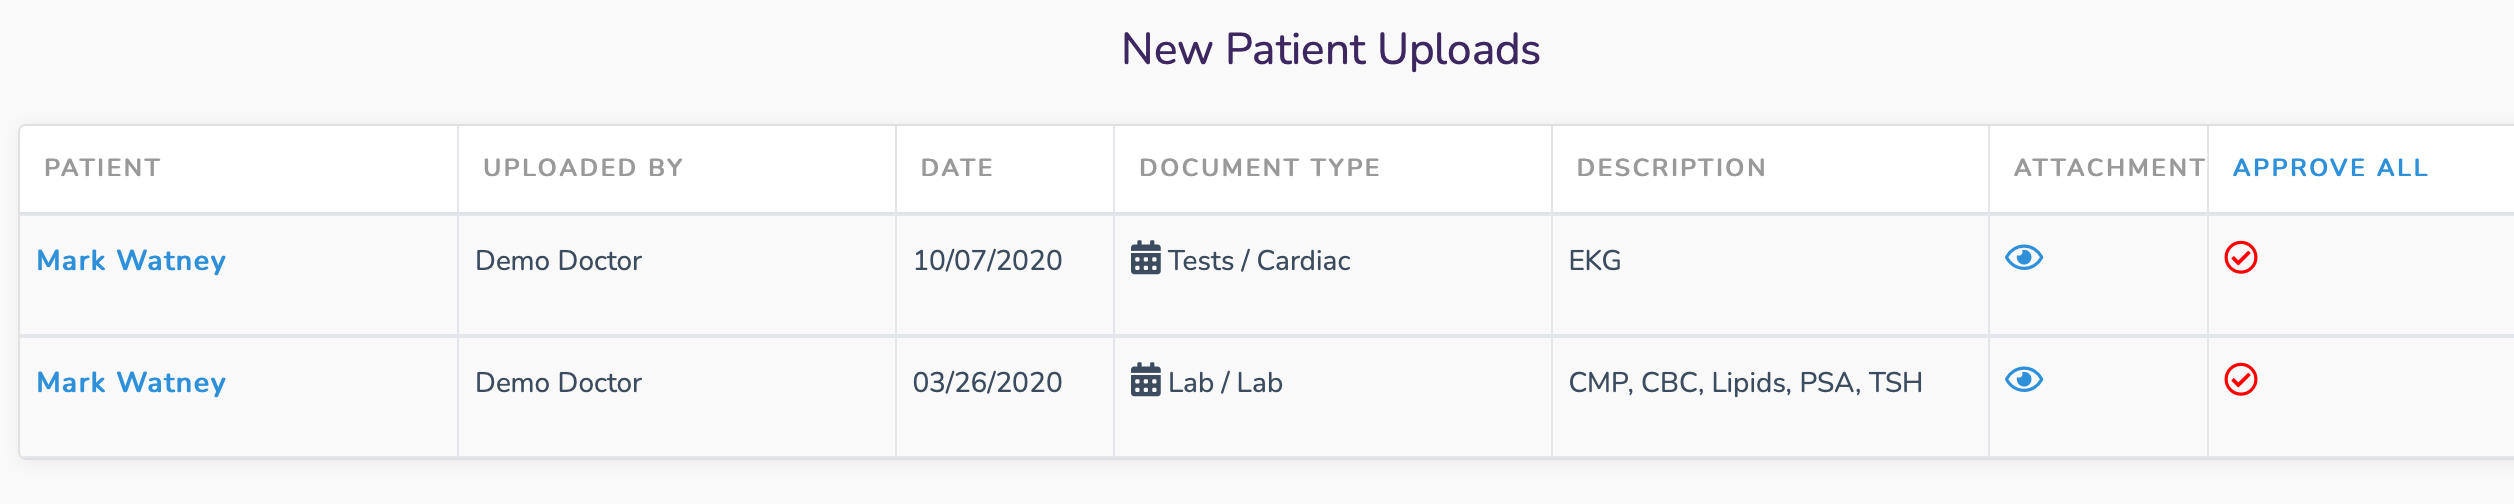
**Select staff members that have permission to approve uploaded files

  • Go to CONTROL PANEL/STAFF ADMIN
  • Select   icon next to staff member
  • Check box if staff member has approval. Uncheck if staff member does not have approval.
Create Notes

Create and edit OFFICE NOTES to patient’s chart.

  • Go to Patient’s chart and select
  • Select type of note to be added. Each type will show different color highlights under OFFICE NOTES

    • ADD PHONE CALL NOTE
    • ADD EMAIL NOTE
    • ADD OFFICE NOTE
    • ADD NURSE NOTE
    • ADD HOSPITAL NOTE
    • ADD PHYSICAL NOTE
    • ADD E-REPORT (PHYSICAL, PRE-OPERATIVE, CONSULTS)
      • (SEE E-REPORT HELP)

Below each note you have the following options;

  • EXPAND
    • Expand the note page by opening a new tab from your browser. This will keep an office note page open while you refer back to the patient’s chart.  Similar action by choosing icon top left corner
  • CLOSE
  • SAVE CHANGES

Edit Notes:
  • To the right of each note is an ACTION option
    •  EDIT NOTE
    •  DELETE NOTE

ADDING PHOTOS

Images can be added to OFFICE NOTES, TELEMED VISIT, HOSPITAL VISIT and PHYSICALS

  • From any of these options under NOTES, select the PICTURE ICON  from the tool bar

  • Select the arrow  and upload the file to be added (JPEG and PNG will work best)
  • The Width and Height numbers will show. If they do not show, then the file is too large
  • Edit the Width to the size you prefer (300 seems to be ideal)
  • Select SAVE

Add and edit MEDICATIONS to patient’s chart.  Medications will display in order based on systems (Cardiac, Pulmonary, Gastrointestinal, etc)

  • Go to Patient’s chart and select
  • To add a new medication, select
    • MEDICATION NAME – Type in the first few letters of the medication and choose from the database which medication to add. Free form names accepted.
    • MEDICATION TYPE – Choose medication type from the drop-down box. This provides for organization to the medication list.
    • DOSAGE – Enter the dosage instruction
    • DATE PRESCRIBED – Current date auto-populated but can be edited
    • ACTIVE
      • YES if the medication is currently active
      • NO if the medication is no longer active (will display in the PRIOR list)
      • DELETE if you want to permanently remove medication (will not display in the PRIOR list)
    • Choose

To the right of each medication is an ACTION option

  •  EDIT MEDICATION
  •  Create a TASK to refill medication.
    • TASK will auto populate patient name, drug name, dosage and preferred pharmacy. Manually enter quantity, number of refills and any other instructions.  Choose SAVE and TASK will be added to the EMR for staff to respond.

PREFERRED PHARMACY

  • Enter 1st and 2nd Preferred Pharmacy Numbers and choose update to store in patient’s chart.

Templates are reusable stored blocks of text available to add to patient charts.  When creating office note, physicals, pre-operative reports or email, these templates can be auto populated or added later.
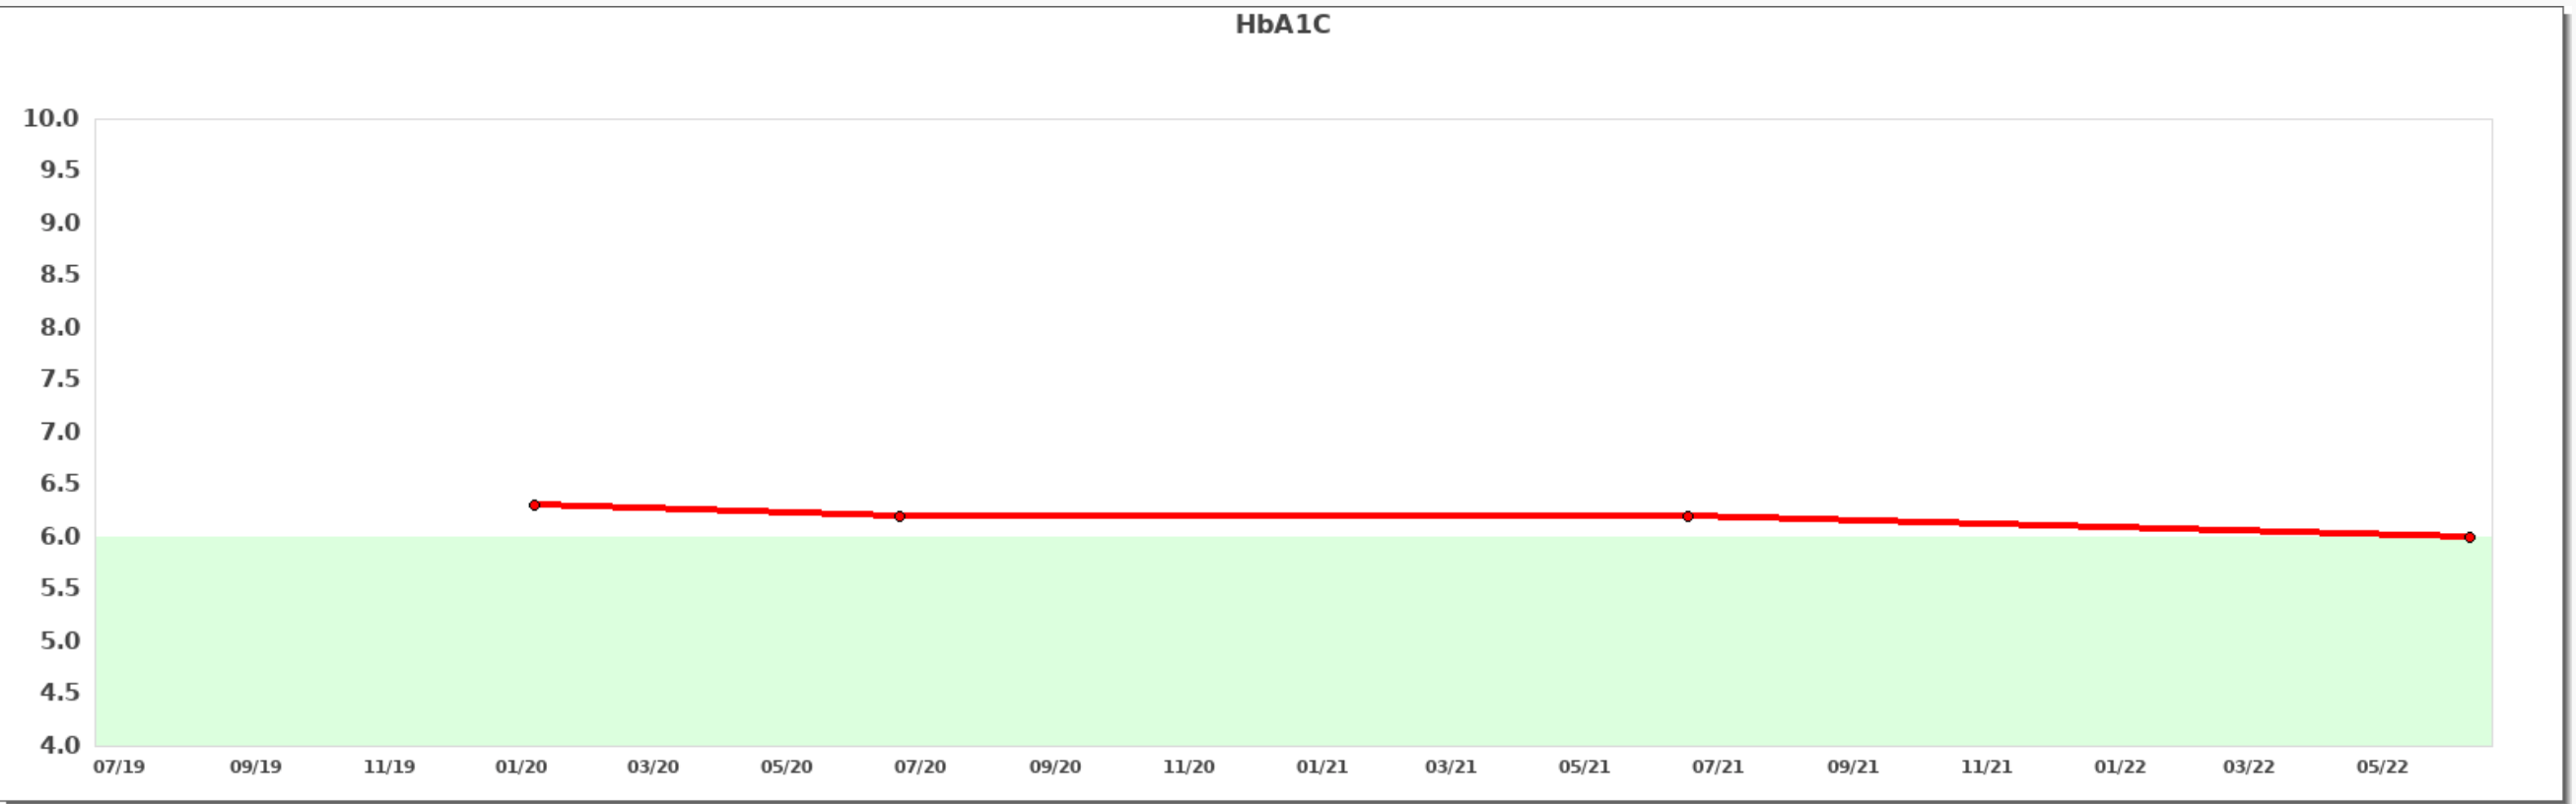
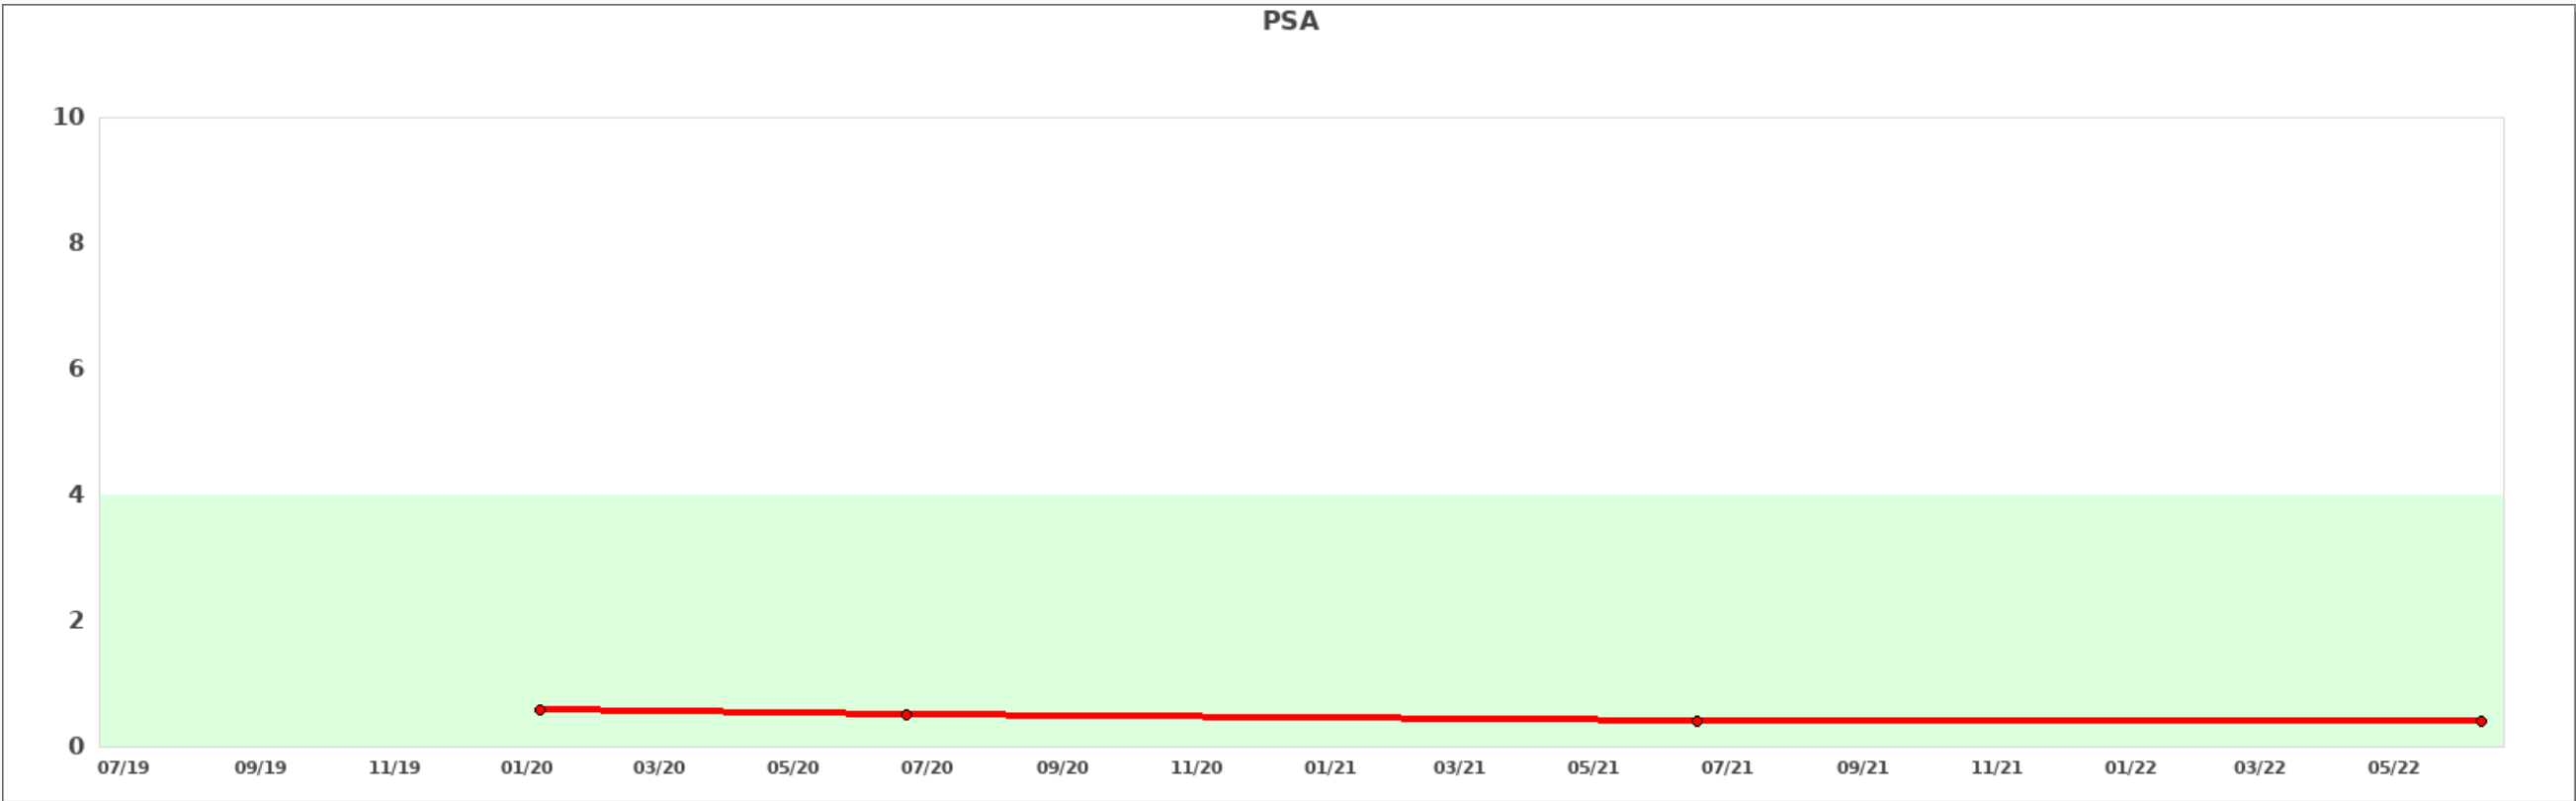
Create NEW TEMPLATES
  • Go to CONTROL PANEL  then 
  • Choose  to create a new template
    • NAME – Create a Template Name
    • CATEGORY – Choose Category where these templates will be available
      • Greeting (Header for your e-report)
      • Physical Examination Details
      • Review of Systems
      • Assessment (Impression/Recommendations)
      • Next Appointment
    • Is Default?
      • Yes if you want this template to automatically populate when you create a new document.
      • No if you want it available to add manually
    • TEXT – Create new template text
  • to store your new template for future use

Edit TEMPLATES
  • To the right of each template is an ACTION option
    • EDIT
    • DELETE

GRAPH LABS

Generate lab graphs to easily view trends over time.  Lab metrics must be generated first under the Control Panel, then values must be entered when adding/editing lab results to patient’s chart.

SETUP LAB METRICS

  • Go to CONTROL PANEL and select LAB METRICS
  • Select ADD CUSTOM LAB METRIC
    • NAME: Enter metric name such as Glucose, HbA1C, LDL, TSH, Creatinine
    • NORMAL RANGE: Enter low and high for the normal range of the lab
    • MEASURE: Enter units of labs such as mg/dl for sugar, % for HbA1C
    • GRAPH RANGE: Enter low and high for the graph you wish to view. Example low 0 and high 10 for PSA
    • IS ACTIVE?: YES if you want this lab to be available
  • Select SAVE
  • Select to edit these options

ENTER LAB METRICS

  • From the Patient’s chart, open LABS then ADD LAB RESULT
    • DATE PERFORMED: Date labs was completed
    • LAB RESULTS DESCRIPTION: Add description to your file so you know what labs are included such as CMP, CBC, LIPIDS PANEL
    • LAB METRICS: Enter values to Lab Metrics available. Leaving blank will be ignored by the system
    • LAB TO UPLOAD: Add your fPDF file by drag and drop or choose file
    • SAVE

VIEW LAB METRICS

From the Patient’ chart, open LABS then GRAPH LABS.  Select the LAB METRIC graph you wish to view.  Actual values will be available to view below the graph with an option to open that particular file.


Create and edit color flags that will display on individual charts.

  • Go to CONTROL PANEL then
  • Choose
    • NAME
      • Title your new Flag
        • (Examples: Blood Pressure Notification, No Insurance Reminder, Lab Preference)
      • BACKGROUND COLOR – Choose text highlight color
      • TEXT COLOR – Choose font color
      • DESCRIPTION
        • Enter text that will display on patient chart
  • Choose

Edit FLAGS
  • To the right of each flag is an ACTION option
    •  EDIT
    •  DELETE
Create and edit e-reports that are added to patient’s note.
  • Go to Patient’s chart and select then select the ADD E-REPORT icon
    • To create a new e-report, select  
      • INCLUDE THE FOLLOWING – Check off sections that should be included in this report. These sections will be pulled from the patient’s active chart
      • REPORT NAME
      • TYPE
        • Choose PHYSICAL, CONSULTS or PRE-OP. Each type will show different colored highlights under OFFICE NOTES
      • DATE
      • GREETING
        • Manually enter greeting or add header from Templates
          • Choose template from drop-down then choose the plus sign
      • REVIEW OF SYSTEMS
        • Manually enter text or add blocks from Templates
          • Choose template from drop-down then choose the plus sign
      • VITAL STATISTICS
        • Manually enter vitals or populate using data from specific date
      • PHYSICAL
        • Manually enter text or add blocks from Templates
          • Choose template from drop-down then choose the plus sign
      • IMPRESSION/RECOMMENDATIONS
        • Manually enter text or add blocks from Templates
          • Choose template from drop-down then choose the plus sign
      • NEXT APPOINTMENT
        • Manually enter text or add blocks from Templates
          • Choose template from drop-down then choose the plus sign
  • to add e-report to patient’s chart

To Edit e-Reports
  • To the right of each report is an ACTION option
    •  EDIT E-REPORT
    •  CREATE A DUPLICATE E-REPORT TO EDIT
    •  VIEW E-REPORT AS PDF
    •  DELETE E-REPORT

SCRIPT WRITER


Create LABORATORY, RADIOLOGY or GENERIC requisition scripts directly from patient’s chart.  Patient’s demographics are auto-populated including contact information and health insurance.  Quickly and easily add diagnosis from patient’s established medical history and pull from a database that includes medical codes.

  • Go to Patient’s Chart and select the create script icon
  • Select LABS SCRIPT, RADIOLOGY SCRIPT or GENERIC SCRIPT

  • Add LAB, RADIOLOGY or GENERIC Test requested
    • Select from COMMON choices
      • Add under CONTROL PANEL/COMMON SCRIPTS
      • or
    • Begin typing in the open box to search through the database or manually enter info
    • Select ADD
    • Unlimited number of tests can be added
  • Add Patient’s Diagnosis
    • Select from patient’s known medical history, or
    • Begin typing to search through database of ICD-10 codes or manually enter diagnosis
    • Select ADD
    • Unlimited number of diagnosis codes can be added
  • Choose CREATE SCRIPT
  • Script is created
    • Signature is automatically included on all scripts if added to the staff member’s profile
      • CONTROL PANEL, STAFF ADMIN then edit STAFF MEMBER
      • Upload Signature to include on all scripts
    • Scripts automatically saved to PATIENT SCRIPT PAGE

WITHINGS DATA (BLOOD PRESSURE, HEART RATE, WEIGHT)

WITHINGS is an independent company widely known for its connected consumer health devices.  Their services include blood pressure, heart rate and weight monitoring.  Patients will check their vitals at home and these readings will automatically be pulled into their MEDCHARTZ patient chart daily for doctors to review.

To begin, each patient must download the HEALTH MATE APP  on their smartphone or computer and create a username/password.

To setup MEDCHARTZ to connect with the patient’s HEALTH MATE account;

  • Go to Patient’s chart and select
  • Choose CONNECT WITHINGS tab
  • You will be re-directed to the Withings account login.
    • **You may be directed to a previous patient logged in page. If so, make sure you choose THIS IS NOT YOU? to reset
  • Enter patient’s Username (email) and password for their HEALTH MATE account.
  • Select Allow this App

  • You will be re-directed back to the patient’s vitals page
  • Done

MEDCHARTZ will automatically download WITHINGS vitals EVERY FEW HOURS and place them in the MEDCHARTZ INBOX for review before releasing to the patient’s chart.

All uncleared vitals will appear in the practice INBOX for review and processing

  • To the right of each vital is an ACTION option
  • Select to add the vital to the patient’s chart
  • Select  to clear the vital when page refreshes

VIEW/EXPORT PATIENT LIST

To view and print a complete practice list;

  • Go to PATIENT SEARCH located top screen
  • Select SHOW ALL then EXPORT LIST

  • Check off INCLUDE INACITVE PATIENTS if desired
  • Excel Spreadsheet will be generated

MedChartz offers INVOICING & PAYMENT services to your customers.  Invoicing can be setup one time or recurrent, such as monthly or annually.  Accept payments for invoices using our internal CREDIT CARD/ACH solutions, or document a check or cash payments to close invoice.
Invoices are sent via email where patients have the option to pay via the MedChartz portal

CRATER vs STRIPE

  • CRATER is the software MedChartz uses for accounting services, including creating new invoices (one time or recurring), emailing invoices to customers, and keeping track of payments.
  • STRIPE is the software MedChartz uses for credit card and ACH processing only

ACCESS BILLING PORTAL

  • Go to CONTROL PANEL then select

OR

  • From any patient’s chart, select the blue dollar amount next to ACCOUNT BALANCE

SETUP STRIPE CONNECTION

  • If you are accepting credit card and ACH payments, you need to setup a Stripe account through the EMR
          • Go to SETTINGS then STRIPE
          • Choose CONNECT STRIPE
            •  Make sure your popup is not blocked for the website
          • Complete information
  • VISIT STRIPE DASHBOARD to review credit card and ACH processed only.

SETUP CRATER PRICES

  • Prices must be setup first in order to attach to patient invoices
    • Go to PRICES then ADD PRICE
      • NAME – Label the invoice item (Example Single Fee 21-30, Couple Fee 60 & Older, Product X)
      • PRICE – Select price for this item
      • UNIT – DOLLARS will be the default setting
      • DESCRIPTION – Add a description to this item (not required)
    • Select SAVE PRICE
    • Once your PRICES are set, you can now add invoices for patients.

INVOICES show all OPEN and COMPLETED invoices for your patients.  These values will show as ACCOUNT BALANCE for each patient’s medical chart.

*RECURRENT INVOICES are the templates that will add a new invoice to INVOICES.  They will not be added to the total invoice due until the scheduled time pre-set.

ADD ONE-TIME INVOICE

  • Go to INVOICES
  • Select +NEW INVOICES
    • NEW PATIENT – Select patient from drop down
    • INVOICE DATE – Date your new invoice
    • DUE DATE – Date when you invoice is due
    • INVOICE NUMBER – Auto-generated but can be edited
    • PRICES – Select item from the drop down (PRICES you previously created)
    • QUANTITY – Number of items
    • PRICE – Auto-generated but can be edited
    • ADD NEW PRICE – Add multiple items to your invoice
    • NOTES – Include a note to add to your invoice
  • Select

ADD RECURRENT INVOICES

  • Go to RECURRENT INVOICES
  • Select +NEW RECURRENT INVOICES
    • NEW PATIENT – Select patient from drop down
    • START DATE – Date your first new invoice will begin
    • NEXT INVOICE DATE –
    • LIMIT BY – End recurrent invoices after specific date or specific count used.
      Default will be none
    • STATUS – ACTIVE (default) or ON HOLD
    • SELECT FREQUENCY – Select MONTH (default) or YEAR
    • PAYMENT METHOD – CREDIT CARD/ACH or EMAIL PATIENT
    • PRICES – Select item from the drop down (PRICES you previously created)
    • QUANTITY – Number of items
    • PRICE – Auto-generated but can be edited
    • ADD NEW PRICE – Add multiple items to your invoice
    • NOTES – Include a note to add to your invoice
  • Select

FEES

Credit Card Transactions
3.9% plus 30 cents per successful card charge
+1% for international cards
+1% if currency conversion is required

ACH Transactions
1% per transaction